Yacht Completed

William and I have completed the Yacht game.

It ended up being harder than I expected it to be (which seems to always be the case). There are a lot of different ways that the game can move forward – the timer, the user scoring, or the user saying that they are ready for the next roll. And keeping track of the state of the game and the players we messier than I expected.

I also had trouble organizing and designing my script code. The lack of an enforced structure made it difficult to decide what file/class/namespace would have each bit of logic. Between that and my lack of experience with the script language, I spent a lot of time looking for code and moving things around.

It was also somewhat difficult to get used to the more event and schedule driven game flow. For things to animate nicely, we needed to introduce delays where there normally wouldn’t be. For example, the game rolls the dice, the dice animate, then then game tells the players what the roll was and the player class unlocks the player GUI and displays the ready button. In application software, the dice wouldn’t be animating, and that would all be one flow of function calls. For the game, there had to be a scheduled delay between starting the dice animation and telling the players what the result of the roll was.

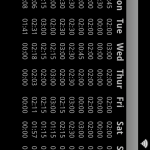
Space was also a more limiting factor than we thought it would be. On the 46″ 1920×1080 screen, the smallest button that the user can feel confident pushing on the first try is 32×32. To get things to fit, the scoring regions ended up being only 24 high.

Here is a screen shot of the completed game:

Touch table construction

The IR sensor for the touch table arrived today (Actually, it arrived Friday afternoon. FedEx failed to leave a note.) Here is a link to the product page at Mesa Mundi. This is the third post about the touch table. Here are the others: MultiTouch, Demo/TV

It came in a large tube:

The tube contained:


The four sides attach to each other with an HDMI plug and one corner has the USB cable. Once connected, the corners each have two screws to lock them together. It is powered through USB and is quite thin. We wont be using the included tape since we want the minimum spacing between the sensor and the TV. Overall, the assembly was simple.

The next step is to place the sensor on the TV, attach it to the computer and install the driver. After installing the driver, and rebooting the computer, the sensor was detected and the control panel allowed us to calibrate the screen.

We assembled the screen upstairs next to a bright window and the light was too high for the sensor. We found a setting in the control panel for bright light later, so it may have worked upstairs, but we had planned to set it up downstairs anyway, so we went ahead and moved it down.

Here is a picture of the current setup. Installing the software was also easy. The control panel has options for palm detection, speed vs accuracy, and lighting levels. The touch detections can be sent out as either TUIO events or windows events. The computer is currently running Windows Vista, which doesn’t support multitouch, so we haven’t tried that out yet. In windows mode the touches are converted to mouse clicks. In TUIO mode, we were able to get about 30 simultaneous touches registered.

A friend is planning to build a custom frame for the TV and sensor and we are eventually going to replace the PC with a laptop.

Hansa Teutonica – Update 1

There has been a lot of progress made on the Hansa Teutonica conversion. The model is done, though the testing has been pretty light. Many of the graphics have been created and the GUI code for interacting with the player is started.

Here is a small portion of the board. The cites, offices, roads and houses are all on. The roads are being built programatically based on a source and destination city and a source and destination direction vector. The board still needs to show the upgrades that can be gotten at some of the cities.

Here is the player board. This is for the active player. Inactive players wont have the buttons at the bottom. It still needs to show the cubes covering the non-upgraded ability levels.

Here is a code snippet of two functions that I wrote to try out the new C++ 11 features. They are both doing the same basic thing: Given the value of a member variable, find the object in a vector that matches that value. First, here is what it would have looked like before:

Item* Object::findItem(const string& itemAttribute)
{
  for ( vector<Object*>::iterator oIter = myItems.begin();
        oIter != myItems.end(); ++oIter )
  {
    if ( (*oIter)->attribute() == itemAttribute )
      return *oIter;
  }
  return nullptr;
}

Here is the same basic idea using the new “for each” syntax. Notice that it is much cleaner. And I don’t have to create the iterator variable at all. There are certainly cases where you are going to need the iterator, but this isn’t one of them.

City* Board::findCity(const string& name)
{
  for each ( City* city in myCities )
    if ( city->name() == name ) return city;
  return nullptr;
}

Finally, here is the version using lambda functions. I’d had high hopes for this approach and was a bit disappointed with the results. There are certainly cases for using lambda functions, but this isn’t really one of them. Though, if this were in a performance critical part of the code, the lambda function might be a bit faster. Also notice the use of the “auto” keyword to declare the iterator. This is another new feature, and is a great benefit. Using either of the two new approaches, I don’t have to know what kind of collection I have to use the collection.

Player* Board::findPlayer(const string& name)
{
  auto pIter =
    find_if(myPlayers.begin(), myPlayers.end(),
            [&name](Player* p){ return p->name() == name; });
  if ( pIter == myPlayers.end() ) return nullptr;
  else return *pIter;
}

Yacht

I have started a new project for the Touch table called Yacht. It is a public domain version of Yatzee. To take advantage of the multi touch screen, and to make the game faster, I am doing a “shared-dice” variant where all the players share the same die rolls. As a player locks/selects dice, they no longer use the shared roll of those die.

It is going to be eight player with each person having a score and dice region.

I am trying to pick a simple game in order to learn the Torque 2D scripting and game builder. The Hansa Teutonica project used Torque 2D as well, but William is handling all of the script and GUI parts. He has been using Torque for years and is going to help me learn the scripting sytems. He is also going to build the graphics that the game will use.

Practice Log – Android+MultiUser completed

The changes to the PracticeLog application and the associated android app are completed. They both access the database on my website through the php interface.

I have created a simple user system:

  1. When you create a new user, I store the username and email along with an encrypted password and generated GUID in my user table.
  2. When a user logs in, the given password is encrypted and compared to the stored password. If correct, the GUID is returned.
  3. The other tables are accessed by the users GUID.

The C# changes were fairly simple. I created a login/new-user dialog and left the local database code so that someone could use the program in a offline mode if they didn’t like the idea of logging into my website.

The Android app was a much bigger job. I was able to use all built-in GUI elements, but the life-cycle issues were much more serious than they were in my first Android application. I didn’t want the user to have to log in every time, so I store the users GUID in the application’s configuration data. I also needed to preserve both the timer’s start time and the entered but unsaved practice time when the application is killed. I learned how to prevent the screen rotation from happening and learned how to store the downloaded data from the web during a screen rotation.

Testing the app was a hassle because my phone loses its connection to eclipse after a few seconds. This is probably a problem with the virtual machine that I am using to do the development with. If I had it to do over, I would go ahead and install java and eclipse on my main machine.

I am still considering releasing this application and app, but would like to figure out the ad model for the android app.

Here is what the app looks like:

Hansa Teutonica

Now that we are getting a multitouch table, it is time to write some games for it.

William has already written GemHoarder and we have decided that the next game will be Hansa Teutonica.  It is a relatively new game that we really enjoy. The game doesn’t have a lot of different cards or exceptions that make a conversion difficult.

We are going to write the game with the Torque 2D game engine. William has already incorporated TUIO events into the engine. It is a C++ engine and I will be creating the back-end game model. The game is turn based, and on each player’s turn they can perform 2-5 actions. We know that we will need to be able to undo actions because the player may click in the wrong place, or just change their mind. The later happens regularly in the physical version. So I am going to create a model of the players and the board and then a move system that modifies the model. Finally, there will be some kind of game-runner that interfaces with the GUI to find out what the player wants to do, constructs the move, has the move apply itself, and then saves the move so that it can be undone.

I am also looking forward to trying out some of the new features in C++ 11. My previous C++ application was written with Visual Studio 2008 because the CLI/.NET intellisense is broken in VS 2010. Since I wont be using any of the managed code for this project, I can use VS 10 which supports most of C++ 11. The features that I am planning to try out are the “for each” statement and the Lambda functions.

Touch screen demo

We went to Fort Collins to see the Mesa Mundi multitouch system today. (See original post)

The IR sensor was mounted to a 46″ Sony (A Google TV). It is a very thin system, at most 1/2″ thick, and could detect more than 20 fingers at once. They were using it to run the D20pro role playing system (which was pretty cool). That system was not really designed with a large touch screen in mind, and some of the buttons and menus were a bit small to hit accurately. The sensor also had a higher latency than we had hoped. If you moved your finger across the screen, the cursor stayed a few inches behind.

William’s GemHoarder software ran flawlessly on the screen. The screen was sending out TUIO events and the game connected and played just fine. See a video of GemHoarder here.

The demo was enough to convince us that the IR sensor system was the way to go and so we bought the TV that we are going to attach the screen to. The TV was recommended by the helpful owner of Mesa Mundi as being a perfect match for the 46″ screen. It is the Sony Bravia NX720:

There are several features that make it well suited for our setup.

  1. It is very thin which will make mounting it in a table easier and will leave plenty of leg room under the table.
  2. There is no bevel around the edge. We need the screen to be as close as possible to the IR overlay so that there is a minimum of distance between when a touch is detected by the IR sensor and when your finger touches the screen.
  3. The viewing angle is excellent, even from the top and bottom. The top/bottom viewing angle is bad on many monitors because you are rarely looking at a TV from significantly above or below it (as opposed to sitting off to the side). But we plan to have people sitting all around the table.
  4. It was on sale at Best Buy for the super bowl.

It may be the only one of its kind that was sold during that sale that wasn’t used to watch the super bowl.

Multitouch table options

A multitouch table is a computer with a large display that can detect multiple fingers and or objects that are touching the display. Each of these fingers/objects can be tracked by the computer and used to control the software. Think Minority Report.

Imagine being able to play board games without having to waste time setting up and putting away the game, without having to have a ‘banker’, without misinterpreted rules. Or imagine playing computer games where your team or opponents are sitting around the table with you. Currently, the price of these systems put them outside the mainstream, but as the technology improves, I think they will be adopted by more and more people.

William has been in the market for a multitouch table for a long time and has considered several options.

  1. Projector and web-cam with acrylic screen
  2. Microsoft Surface and Surface 2
  3. Multitouch monitor
  4. IR sensor

Each of the options above has some advantages and disadvantages:

The projector/web-cam approach is what he considered first because it allows a large screen while keeping the cost low(ish). The main concern with this option is that there would be a lot of trial and error involved in getting the projector and camera setup in a reliable manor.

The Microsoft surface is a nice, if expensive, system. The original surface was a $7000 30″ unit. It was a little small and the sides of the table came straight down making it inconvenient to sit around. Surface 2.0 just came out. It is $10000, has a 40″ screen and looks like a normal table. It also has a per-pixel camera system so that it can detect objects and read bar codes on the bottoms of objects set on the surface. Another disadvantage is that the computer is built into the surface which would make it difficult to upgrade.

Multitouch monitors are smaller than we are looking for in a gaming table. And the large ones are prohibitively expensive.

The IR sensor system is an overlay that you can place over the top of any monitor that detects objects that break the ring of IR lights. It is a cheaper solution. William recently found a company called Mesa Mundi which sells large multitouch IR sensors. It turns out that an early prototype of their system is being used for a D20 gaming session being held at Gryphon Games in Fort Collins this weekend.

Practice Log – Android version

I have been using the PracticeLog for a little over a year now and have found it to be very useful. However, there are several features that I never use:

  1. The list of pieces that I am practicing. This would be nice to keep up to date, but even with the “Same as Yesterday” button, I just don’t have the motivation to keep entering the data.
  2. The stopwatch and countdown. I haven’t been practicing in the same room as the computer, so it is not handy to have to turn on the computer both before and after practice time. Instead I have been using a stopwatch on my phone, or just my watch to time the practice and then separately enter the time.

I would like to use my Android phone, which I usually have on me, to record the practice time. To do that, I am going to create a web database and php accessors so that I can load and update practice time from the phone or computer. While doing this conversion, I am going to make a few changes:

  1. Remove the list of pieces practiced per day. It would make the database more complex and I never use the feature.
  2. Make the database multi-user. This will allow me to publish the application and Android app. I am not sure if that will ever happen, but the software has been useful for me, so it might be appreciated by others too.

This will be the first time I have made a multi-user web database, so I am debating how to handle security. I want each user to only have access to their own data, but don’t want the overhead of encrypting all the data.

After my experience with the DurationAlarm application, I suspect that the Android app will take most of the time. But all of the GUI elements that I will need are built in.

Bialetti Moka

For Christmas I asked for and received a Bialetti Moka Coffee Pot. Check out the wikipedia page for a complete description.

It is a great little device which makes 3 shots of espresso on the stove top. It takes about three tablespoons of grounds and you fill the base with water. After about 2 minutes on the stove, the water boils and the steam pressure forces the water up through the grounds, up a stem and into the top of the pot. It takes about 20 seconds for all the water to run through the coffee once it boils. Then you just pour out your three shots of espresso.